Version Control

Why do you need version control?
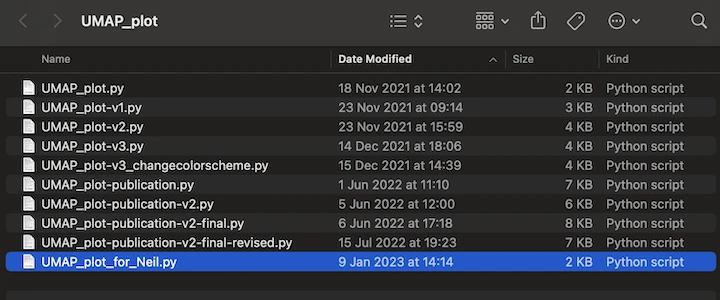
Does this situation seem familiar?

Most of us have probably been at that point. Not just with python scripts, also with Word files or other things. But scripts seem to have a particular tendency to provoke this pattern. You run it, find some small error, correct the error, take it to a different computer, have to change a path, make a new version, go back to your original machine, and so on and so forth…
Fortunately, there is a solution! Let me introduce…Git.
The basics of Git
When I started coding, I heard of Git and GitHub early on but didn’t quite see why they would be useful or how to get started. Probably you have already heard of Git, or other version control systems (VCS).
From my own journey and others’ experience, I can tell you that while Git seems somewhat annoying at the start and like an unnecessary overhead, it pays of really quickly.
The idea
The basic idea behind a VCS like Git is that it tracks all of your changes to files inside a “repository”. You would then take a bunch of changes you have made and group them into a “commit”. The commit gets deposited into your log (the history of the repository) and if you want to go back at a later point, all you have to do is “check out” that commit.
In addition to the local repository that lives on your computer, you can have remote repositories to sync with. That makes it easy to share your code with other machines, your colleagues, or the world.
6 commands to get you started
Luckily, you really don’t need a lot to get started. A few commands cover 95% of my day-to-day Git usage. And for the more complicated cases, you can virtually always find the precise answer on StackOverflow
Let’s get started using Git!
Installation
For installation instructions, see the Git docs. On MacOS and Linux, you will use Git through the system terminal. On Windows, you can use it through the Git terminal that comes with the installation, or through WSL.
git init
First, we initialize a new repository.
Let’s call it myfirstrepo.
In the terminal, type:
mkdir myfirstrepo
cd _  # _ is a shortcut to reuse the last argument
git init
And that’s it, we have a new (empty) repository!
git status
Let’s start by creating a new file.
echo "# This is my first git repo" > README.md
And now let’s check what changes Git sees using git status:
You will see something like:
On branch main

No commits yet

Untracked files:
 (use "git add <file>..." to include in what will be committed)
 README.md

nothing added to commit but untracked files present (use "git add" to track)
So it tells you that there is one file README.md that it is not tracking yet (not every file in a repo needs to be tracked).
Our first task is to change that!
git add
To add the file to git, or to “stage” changes made to a file, we use git add <path/to/file>.
git add README.md
(Note: You can use git add <path/to/directory> to add all files within a directory to the staging area and, consequently, git add . to add all files in the repo)
Now try git status again and observe the difference!
Our file is now “staged”. meaning it will be included in the next commit.
At first, you might wonder why we need this intermediary staging at all,
but you will quickly realize how this lets you be selective about what to include in a certain commit.
git commit
Now that we have added our change, we want to commit it and hence persist it in the history of our repo. We add a message describing what we did in the commit. Through this message it will be easy to find the commit later, if we notice we need to go back.
git commit -m "add README.md"
And that’s it! You have made your first commit.
git log
Now, let’s take a look into our repo’s history.
Typing git log will give you something like:
commit 326368ba9b46b0f5a79ecf4f89c095d14d1d7a8d (HEAD -> main)
Author: jugoetz <[email protected]>
Date:   Sun Aug 20 15:27:41 2023 +0200

    add README.md
(END)
Note the commit hash (the hexadecimal number in the first line). This is the unique identifier of the commit that you can use to cite it or to check it out. The rest is some metadata about author, date, and the message we added earlier. As you add commits, this log will grow, the most recent commit always being on top.
Exit this view by pressing q.
git diff
The final essential command we want to look at is git diff.
For that, let’s make a change to our file README.md
echo "Wow, the basics of git are really easy to learn" >> README.md
If you check git status again, it will tell you that the file README.mdhas changed.
But what exactly has changed? That’s what we need git diff for.
You can use it just like that to see all differences for all files, compared to the last commit, but let’s be a bit more granular.
git diff -r HEAD README.md
First, let’s take apart this command:
git diff README.mdcompares the current state of only the fileREADME.mdwith the last committed state (theHEAD).- The flag
-rlets us specify a specific revision to compare to. When we useHEADthe result is actually the same as above, but we could use any commit hash (that hexadecimal number) to compare to any commit in our log.
Second, let’s try to make sense of the output:
diff --git a/README.md b/README.md
index 032fac4..007a99e 100644
--- a/README.md
+++ b/README.md
@@ -1 +1,2 @@
 # This is my first git repo
+Wow, the basics of git are really easy to learn
- The
---and+++lines serve as a legend to tell you which is the old (minus) and which is the new (plus) file. - The
@@ -1 +1,2 @@header tells us that the following chunk contains line 1 of the old file and lines 1–2 of the new file - The remaining lines are lines from the original files, prefixed with either a space,
-, or+. Lines with a space are in both old and new,-are only in old and+are only in new.
Check-in
At this point, you have the rudimentary toolkit for local Git operations. Try it out! Create a new file, commit it, make some changes to both files, and commit all changes at the same time!
Now what about GitHub/GitLab/…?
Remote repositories are very useful. It can be just for backup, to move code between multiple machines you work on, to share it with your colleagues, or to show your code to the world in a public repository.
Create an account with your preferred provider and let’s get started using a remote. (I will use GitHub in the following, but the process is nearly identical with GitLab.) GitHub and GitLab have their own, excellent tutorials for the following procedures, so I will keep this part short.
git clone
Cloning copies a remote repository to your local machine. You might have encountered this when installing open-source packages, even if you have not used Git for your own code. Cloning is as easy as:
git clone https://github.com/jugoetz/ir-plot.git # feel free to substitute the link with your own repository
This will create a directory ir-plot inside your current directory, containing a local copy of the Git repo.
You can also specify a different directory to clone into like git clone https://github.com/jugoetz/ir-plot.git <path/to/dir>.
git pull
If something changes on the remote, at some point you will want to have these changes on your local machine.
To sync the changes from the remote just use git pull.
Note: If you have made local changes that are not committed, this can lead to a tricky situation. You will need to either commit or stash your changes. Your local changes might also conflict with remote changes, in which case you would need to merge them. All that is out of scope for a basic introduction, but easy to find online.
git push
Finally, git push is the counterpart to git pull.
It allows you to upload your local changes to the remote repository.
You need write permission on the repository to perform this action, so you can try it with one of your own repositories.
How to proceed
This is really all you need to know for the start. Make it a habit to use Git for your code, and you will pick up the rest on the go. I only want to give you two more pointers to things I have not explained in the very basic introduction here, but that will become useful soon.
git branch: Branch off your working tree to try implementing larger features while keeping the original code functional. You can make multiple commits and then merge the branch back intomainwhen all your changes are made..gitignore: A special file in your repo where you can list files and directories that you want to exclude from Git’s tracking
Key points
- Using a version control system, or VCS, becomes a necessity when you progress beyond the simplest of scripts
- The commands
git init,git diff,git status,git add,git commit, andgit logare all you need to get started locally - If you use your code on more than one machine, you will probably want to use a remote repository (e.g. on GitHub, GitLab)
git clone,git pull, andgit pushare your basic command set for interacting with the remote